You want to create your own website and after comparing the different CMS you decided to use WordPress ? Even though most of the hosting companies can install it automatically for you, we fully recomand to do it manually in order to have a better control of its configuration and to be certain to use the last version of WordPress. Famous for its quick and easy installation, we will explain in this article how to install WordPress on your server step by step. Follow the guide !
Step 1 : Download WordPress
The first thing you need to do is to download all the WordPress files on your computer. After unziping the folder, you will have access to all the WordPress PHP files.
Step 2 : Create a MySQL Server
In order to use WordPress, it’s mandatory to associate it to a MySQL Server. This server will contain all the informations about your website such as its name, its content, the name of its users and all the settings that you’re going to use. This step has to be done on the administration panel of your host provider. You only need to click on the « Create a Database » button and you will receive an email with a link to generate a password.
Step 3 : Send your WordPress files on your server with FileZilla
Once your database has been crerated, you’ll need to send all the WordPress files on your server. To do that, you can download FileZilla and connect to your server by using your login informations : the host name, your username, your password and the port on which you want to connect. You can retreive all those informations in the mail you must have received after buying your hosting plan.
You can then transfer all the files from the WordPress Zip file to the root of your server. It’s usually a folder called « public_html », « www », or « htdocs » depending on your host provider.
You can also decide to import all those files in a subdomain. As an exemple, if you want your website to be accessible via an URL such as https://mywebsite.com/blog, you only have to create a folder called « blog » and transfer wordpress in it.
The transfer can take a few minutes because there is thousands of files to transfer to your server. You can follow the progress of the transfer at the bottom of FileZilla interface.
Step 4 : Connect WordPress to your Database
Once the transfer of wordpress on your server is done, you need to connect your website to the database your created earlier. To do so, you need to run the script called « install.php ». You can find this script in the « wp-admin » folder or wordpress.
In order to launch this script, you only need to use your browser and go to an url such as : https://mywebsite.com/wp-admin/install.php
You should arrive on a page like the following one :
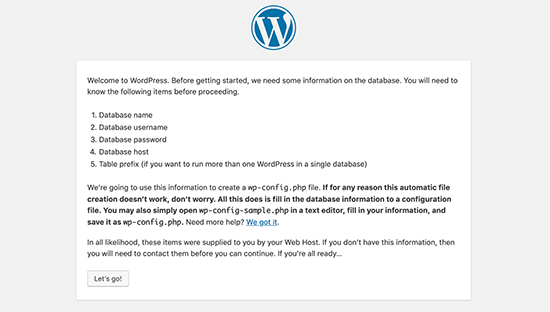
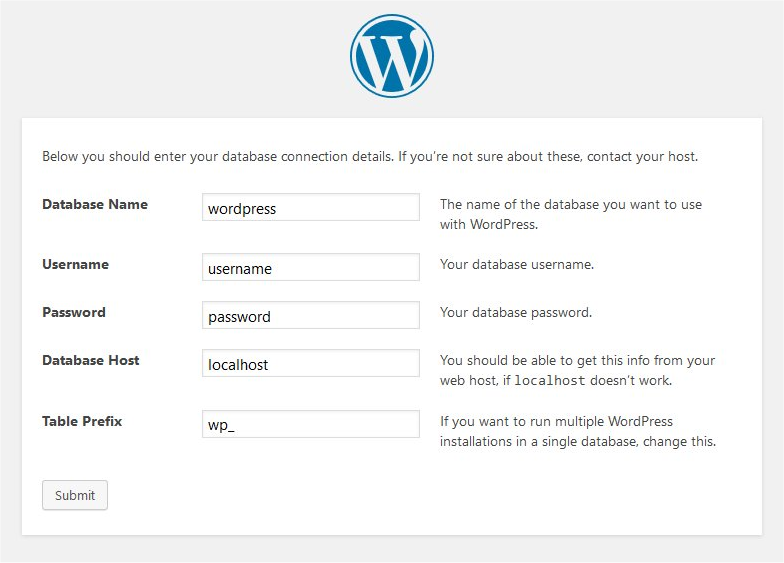
Click on the « Let’s Go! » button and you’ll arrive on a form where you’ll need to put the informations of your database :
Once you filled the form with the right informations, you’ll arrive on a confirmation page. You just need to add the name of your website and create your first user to access WordPress backoffice.
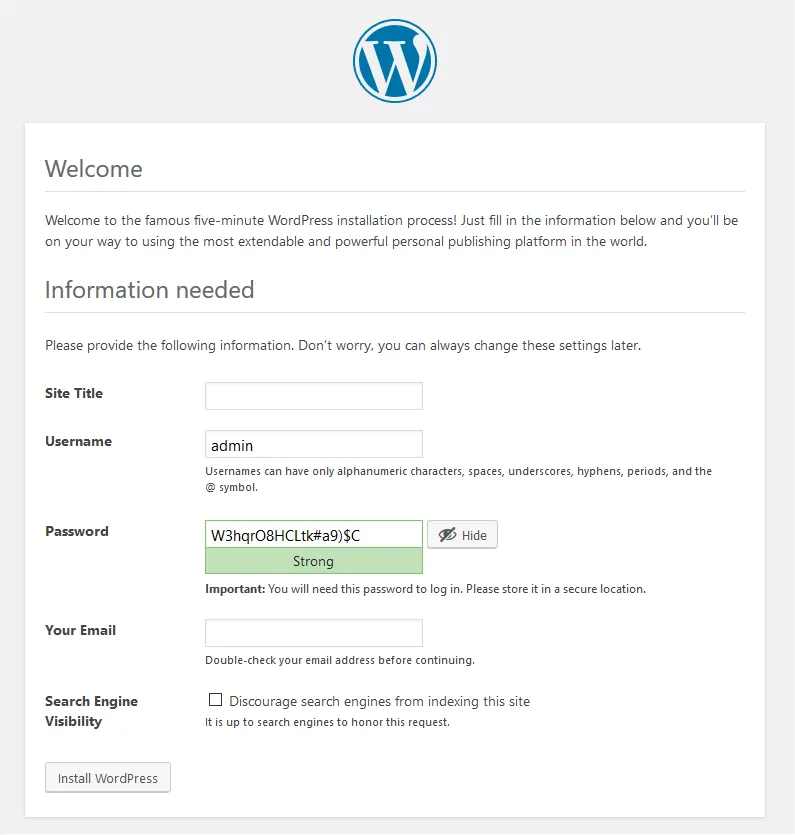
Click on « Install WordPress » to end the install of your wordpress website.
That’s it, WordPress has been successfuly installed ! You can now connect to the WordPress back-office and start creating your website !